 ** This post was updated on 13-5-2013 and contains, besides additional information, also statements from RES Software. They responded very quick on the outcome of the security audit and would like to thank them for the nice collaboration **
Lately I was involved in a security and penetration scan at a customer servicing in Healthcare, because they store privacy sensitive information they need to apply to certain security regulations which are audited on a regular basis. Based on the results of this scan I will provide some findings and tips that you can use to further enhance the security of your XenApp environment. This tips are primarily focused on XenApp in combination with RES Workspace manager, but elements can also apply to other environments containing other UEM products.
Lets begin with a short description about the security scan :
The scan was performed by a company specialized in IT related security audits, you can also say the scan was performed by a group of legal hackers 😉
The security scan consisted of 3 parts :
1: Scan from an unauthorized internal perspective (plug in the UTP cable and see how far you can get without any account)
2: Scan from an unauthorized external perspective (try to gain access from outside the corporate network trough external components)
3: Scan from an authorized user perspective (logged in with standard user credentials and see what kind of damage can be done)
Part 1 consisted of multiple scans for weaknesses like missing patches and gathering NTLM hashes to decrypt passwords etc, keypoint here is to consider disabling cached credentials for internal pc’s which doesn’t leave the building or limit the amount of cached credentials (the default is 10 cached credentials on Windows). And of course use strong passwords so when they have access to the hashes the decryption is very time consuming. They use different tools and methods to decrypt hashes, one of them is John the Ripper and pre calculated rainbow tables. When they got access to the password hashes its amazing (and scary) how fast the hash can be decrypted into a plain text password.
Part 2 consisted of a DNS lookup to gather information about external accessible elements of the infrastructure, after they are identified they try to logon using default user names and passwords and scan for other weaknesses. This customer uses Netscaler in DMZ in combination with SMS Passcode authentication, so they didn’t come far on that part. What should be taken into account is webmail\active-sync traffic (which often doesn’t have 2-factor authentication) in combination with password lockout policies, a hacker can perform a denial of service by trying lots of different usernames and wrong password to intentional block users in AD (especially admin accounts).
Part 3 consisted of tests on the XenApp environment while logged in with a normal user account, the following tips are derrived from findings in this part of the scan.
Tip 1: Timing
The first tip is about timing, if you are like me you want to put all of the user environment settings such as policies, registry and application settings as much as possible in RES Workspace Manager. If you are configuring things outside Workspace Manager, you lose the single point of management and that’s one of the key points the customer invested in RES Workspace Manager.
Well there is absolutely nothing wrong with that, but I will give you an example to think about when security is high on your design checklist.
Imagine that the company’s policy is to block the task manager from running in a user session, to do this you can import the CtrlAltDel.admx policy in RES Workspace Manager and disable the Task manager there. This policy backed with the fact you have appguard running in the background to block all unauthorized processes (so also task manager) you should assume it’s absolutely not possible to start the task manager inside the user session, at least I thought so till a saw the security report that proved otherwise…
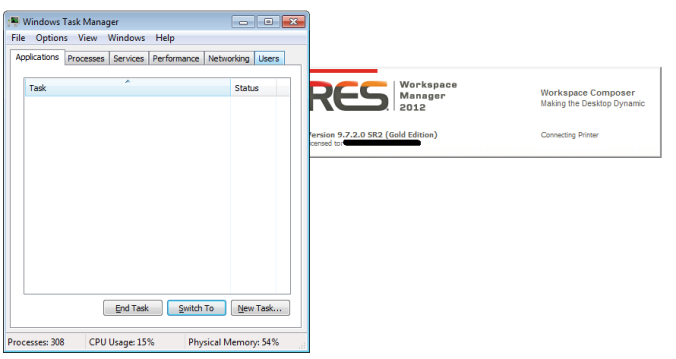
What they did was fairly simple, consider that RES Workspace Manager by design removes all policies at logoff and that it takes some time (seconds) that the policies are applied and before appguard is fully functional when a user logs on. While the workspace composer does its magic, it seems possible to start the task manager through the CTRL-F3 hotkey right after the session is launched (press the hotkey repeatedly after the session is launched). See the following screenshot how this looks like.
After Task Manager is launched, RES Workspace manager completes the workspace with all policies and rules so starting any unauthorized processes through task manager isn’t possible, but users can see information you rather want to hide (like performance, who is logged on etc). But besides that when you click on browse in task manager before the Workspace Composer applies the drive restriction settings it is possible to browse the C Drive even when you strictly prohibited this in RES Workspace Manager :
Workaround :
If you (or your customer) don’t care about users accessing task manager and local drives, there is absolutely nothing you have to do here, but if the company’s policy is to strictly hide task manager and to hide and prevent access to local drives, you can do the following things to overcome this timing issue :
– Apply the task manager policy through AD, this policy is applied in an earlier stage when a user logs on so passing the hotkey at session creation has no effect
– Consider using desktop viewer, if you use desktop viewer it’s not possible to pass hotkeys
– Modify the default ica file on the Webinterface\Storefront server and disable hotkeys there (Thanks Kees Baggerman for pointing this one out!)
RES Software statement :
The timing issue with taskmanager will be fixed in a upcoming service release of RES Workspace Manager, expect a custom executable to test with shortly.
Tip 2: Macro security
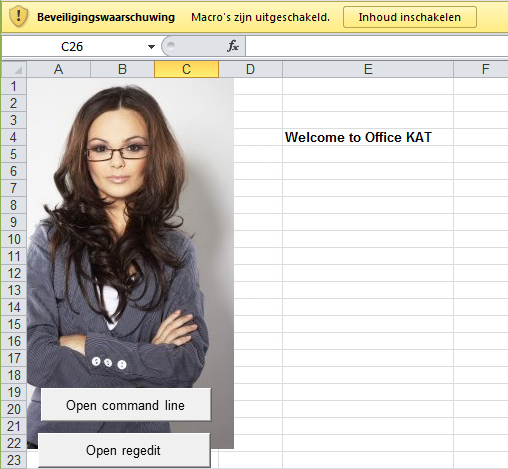
Another way to bypass the application guard is to run processes inside memory of other (allowed) processes. This is often done through Office, because most of the time this processes are marked as trusted and malicious code can be easily fired of using macro’s. The Office KAT excel sheet (sources are at the bottom of this post) is an example of a sheet containing such macro’s. When opening Office KAT in a user session with default office settings, the user is prompted to allow the macro’s (message is in Dutch but it says : warning macro’s are turned off, enable content to turn them on) :
When the content is enabled, we click on “open command line” and we are prompted with the following message :
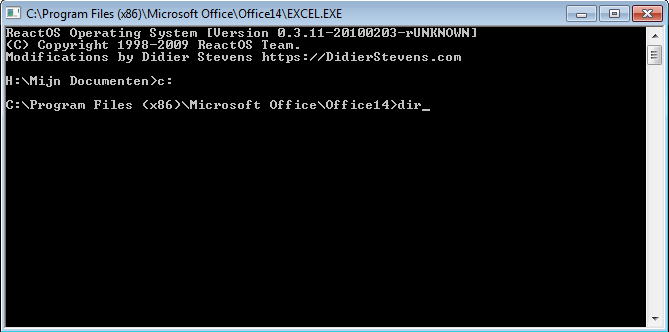
After clicking OK, the command prompt is started, in the following screenshot you can see that the actual process is Excel.exe, you can also see that we can easily switch to the C drive and browse through the contents of the XenApp server (note that drive restriction policy are ignored) :
(Please note that this user session hasn’t got access to the command prompt and that access to local drives are strictly prohibited).
And when we click on “open regedit” from Office KAT, which launches a registry editor under the Excel.exe process, you can see how simple it is to browse the whole registry of the XenApp server :
After chatting with Kees Baggerman about this topic, he pointed me to a similar Excel macro from Remko Weijnen, Remko was the first pointing out that there was a way to bypass the application guard by running untrusted processes in memory of authorized processes using a Excel macro. You can read about it here. This was one of the reasons that RES tightened the security rules of the application guard driver, they did this by blocking the svchost process from running other (unauthorized) processes indirectly. This security enhancement is available since Workspace Manager 2011 SR4, the following rule is created (and disabled) by default in new RES Workspace Manager deployments :
Note : Check this rule out if you upgraded your environment till this point, because during upgrade the rule is created and enabled by default, this is done to avoid security warnings thrown at your users after the upgrade, you can run the rule in logging mode for a while to identify what the impact will be in your environment. So if you want to harden your environment you should disable this rule.
Another way to tighten the security of your RES environment is by restricting a managed application to be only launched by Workspace Manager itself (see below screenshot). This prevents the managed application to be launched through other applications or unmanaged file types. This example video contains Remko’s macro in combination with this setting, you can see that the authorized process (excel.exe in the video example) isn’t started by RES Workspace Manager itself and thereby blocked from launching after this setting is active.

Back to the Office KAT sheet which was used in the security scan, I tested all of this security settings in combination with Office KAT and it happens to be that I could still run the CMD and Regedit instance, I think this is because the macro’s in Office KAT starts a different embedded CMD instance in memory (ReactOS) without reading\executing anything from disk. I think this is why application guard cannot detect it, and this would probably the moment where the virusscanner should kick in.
Does it mean that malicious macro’s like Office KAT can put your environment in direct danger? No not really because we still have only user rights and any processes launched from the command prompt will be blocked by appguard. But what might be a risk is that the content of the local drives and the registry is exposed which may contain sensitive information about your infrastructure. Besides that there is another risk in the way how the default file system in Windows is designed, Tip 3 will go further on this subject but first : how can we prevent this kind of Macro’s from running?
Workaround :
– You can define trusted locations (Office 2010 and above) and run unsigned macro’s from there, when using trusted locations the Trust Center security feature is bypassed, but please note that Office KAT isn’t noticed by this feature so I wouldn’t rely on this feature only
– You can disable all macro’s through a policy or only allow signed macro’s
– Some virus scanners (also windows defender in Windows 8) detects Office KAT as a thread and places the Excel sheet in quarantine, but there are more variants of this macro’s and not all virus scanners detects them, if you want to rely on the virus scanner pick one that’s designed to detect this kind of malicious macro’s. Also be careful with stripping your virusscanner to optimize performance, it maybe you win on performance but on the other hand you might lose on security. You can download Office KAT at the bottom of this post to check if your virusscanner detects it.
RES Software statement :
This kind of macro’s, which runs malicious code totally in memory (ReactOS in this case), is out of the scope of RES appguard, this type of macro’s should be detected by the virusscanner. (They added to this that there will be an even more tighter security mechanism in the current under development .net version of RES Workspace Manager).
Tip 3: File system security
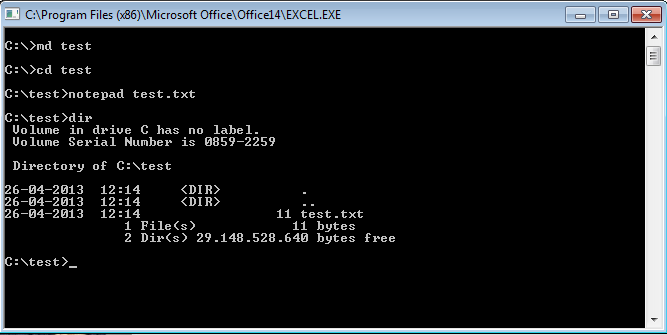
So in Tip 1 and 2 we found possible ways to get access to the local drives of the XenApp server even when access to them is strictly prohibited through policies. Besides exposing sensitive information, there is another culprit when users have access to local drives : The default ACL’s in Windows allows users to create folders on the local drives and store data in it. See below an example of CMD running under the Excel process, creating a folder and store data in it :
You can imagine that users (or hackers with user rights) with bad intentions can make a mess of your XenApp server and even worse they can fill up the disk with data till the disk reaches full capacity which can result in a denial of service. The benefit of using provisioned XenApp servers is that they revert to a clean state after each reboot, but the risk stays the same and may be even worse because the write-cache will grow and you can end up with failing XenApp servers because the write-cache location isn’t sized for that. Also when using provsioning in combination with a local disk for the write-cache, the same default file system security applies to this disk. We can for example browse to the D drive and see the cache file :
By default users can create folders on this disk which will persist after a reboot, when this disk is filled with data the cache file cannot grow any further. This can affect the XenApp server during run time but also after a reboot!
Workaround :
I think the most recommended way to address this risk is to accept that users in some way can access the local drives of the XenApp server, you can hide them and narrow the risk that they can be accessed through Tip 1 and 2 for example, but it’s hard to totally prevent it. Some applications for instance doesn’t respect the drive restriction policies and can expose access to the local drives. To prevent write access to the local drives you can use the RES Workspace Manager security feature called Read-only blanketing (RoB), this feature transforms the local drives to read-only drives without messing around with the default ACL’s, it’s there in Silver (security) and Gold edition, so if you are not using this feature yet you might consider it!
Conclusion :
In this blog post I showed you some simple tips to further enhance the security of your XenApp environment in combination with RES Workspace Manager. Hopefully this information was helpful for you when security is an important consideration in your environment or design. How tight you need to secure your XenApp environment depends on the kind of company and type of data you are securing. Most of the time the more secure you make it, the more complex it will become. It’s all about eliminating risks, but I think even more important : accepting risks.
With RES Workspace Manager it becomes a lot easier to harden your environment from a user perspective, use the security features and maybe more important audit this features on ongoing basis.
You can download Office KAT here, it’s part of the Interactive Kiosk Attack Tools (iKAT) which contains more useful tools to test the security of your environment. Please be careful browsing this pages because it can contains content and material not suitable for work.
Please note that the information in this blog is provided as is without warranty of any kind.
