Make sure to also check this blogpost about a very handy tool named Remote Display Analyzer
A graphical deep dive into XenDesktop 7
Intro
A while ago I wrote an article about Adaptive Display and how it can be fine tuned. Well Adaptive Display as we know it hasn’t seen the light for a very long time because a lot has been changed in XenDesktop 7. In this blog post I will describe this changes and dig deeper in the configurable options related to graphics in XenDesktop 7.
Adaptive Display First generation = Legacy Graphics mode
In a short time frame a lot have changed in the delivery of graphics, users are demanding more media content, higher frame rates and a fluid user experience. While Progressive display did a very good job for a long time, it required a lot of manual tuning to accommodate different use cases, because of this it was often misconfigured resulting in a degraded user experience. To overcome this problem Citrix developed the first generation of Adaptive Display, it was still based on settings around progressive display but it was now auto tuning according to the available bandwidth and the capabilities of the client device. The concept of this first generation was simple : use a different compression algorithm for moving images and still images and tune it on the fly.
Adaptive Display Second generation, the new standard in XenDesktop 7
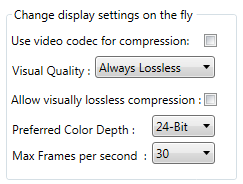
Well this concept is pretty much the same in the second generation of Adaptive Display but it’s now based on different codecs, the SuperCodec as Citrix calls it can dynamically decide which compression is used for different parts of the screen. The most important codec that is used in the second generation of Adaptive Display is the H.264 deep compression codec which we also know from HDX 3D Pro, together with features like Desktop Composition Redirection it forms the base of Adaptive Display second generation, before I go on let’s summarize the most important new graphics settings in XenDesktop 7 :
|
Policy
|
Default setting
|
Goal
|
| Legacy Graphics Mode |
Off |
Revert to Adaptive Display first generation |
| Target Frame rate |
30 |
Sets the maximum frames send to the client (now up to 60 FPs can be configured!) |
| Visual Quality |
Medium |
Sets the level of compression for the new codecs, besides low, medium and high also build to lossless or always lossless can be selected |
| Desktop Composition Redirection |
Enabled |
Render Windows Desktop Manager (WDM) generated graphics on the client |
| Desktop Composition Redirection Quality |
Medium |
Sets the default level of compression for Desktop Composition Redirection |
I think the above settings are the most important changes in XenDesktop 7 according to graphics, besides that there are a lot of windows media related policies added. There is nothing really arranged what’s current and what’s legacy so it’s easy to get lost if you don’t know where Citrix came from with Adaptive Display first generation and beyond. You can only see on what kind of OS it applies but that’s about it.
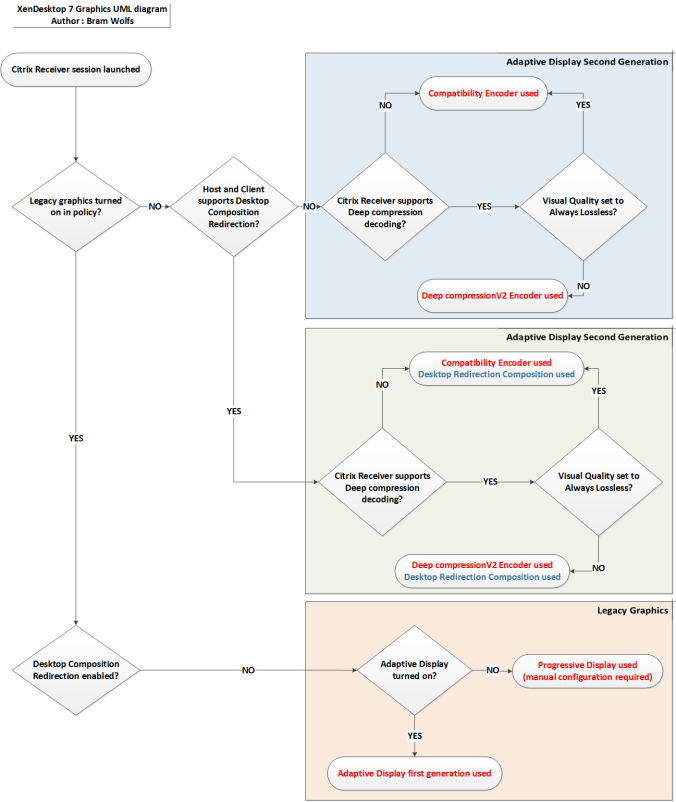
I tried every combination of the above policies and made an UML diagram of my findings, the diagram shows the descisions made from the moment the session is launched (click to enlarge) :
H.264 Deep Compression codec
Citrix was the first vendor to use H.264 compression for delivering graphics through their remote display protocol (ICA), it was targeted for a specific use case : 3D modelling and graphics designers. At the beginning the first version of this codec was only available when combined with Nvidia GPU cards that had enough Cuda cores, as the codec was designed to leverage the Cuda cores for compression and encoding.
Later the codec have evolved and Citrix made it also possible to encode completely in CPU. The new version, called the Deep Compression V2 codec, uses even less bandwidth then it’s predecessor and since it’s CPU based it can be used for a lot more use cases. There is one downside though, since it’s CPU based (default setting) the load on the host side increases and can affect the scalability of the total solution, when CPU resources are limited or scalability is a concern in your environment you have the following options in XenDesktop 7 (please note that it’s about finding the right mix between server scalability, bandwidth usage and user experience. What’s best for your environment depends on the use case and of course the amount of $$$ you can spend) :
Option 1 : Leverage the new Desktop Composition Redirection feature to offload the host CPU
Citrix extended the aero redirection feature (known from XD 5) and made it possible to remote Desktop Window Manager (DWM) DirectX commands to the client to be rendered there. This also means that graphics generated from application like Internet Explorer, Office 2010 and other modern applications are offloaded to the client. You will also notice when installing the XenDesktop 7 VDA on Windows 7 that the Aero theme is enabled by default, even when you disable Desktop Composition Redirection the Aero theme can still be used completely rendered on the new WDDM driver on the host side. The quality of Desktop Composition Redirection can be configured in the following policy :

While this feature is awesome, since it leverages the clients capabilities and thus lowering the resources needed on the host side, there are some attention points when using Desktop Composition Redirection:
– On the host side you need a Desktop OS (Windows 7 or Windows 8)
– On the client side you need a compatible Windows client with a moderate GPU
– Doesn’t work in legacy graphics mode (Adaptive Display first generation)
– Increased bandwidth when using server rendered video
Desktop Composition redirection together with the new compression codecs forms the base of Adaptive Display second generation. It’s a combination that’s default enabled when connecting from a windows Client. If you use this combination you have to keep them both in mind when fine tuning the user experience. For example you configure the visual quality to always lossless to prevent lossy data send to the client (for medical purposes for example). You will still see lossy artefacts like the below example in Wordpad.

To get a really lossless experience you have to either disable Desktop Composition Redirection or set the graphics quality of Desktop Composition also to lossless, increased bandwidth consumption needs to be taken into account of course.
Option 2 : Turn on the legacy graphics mode policy
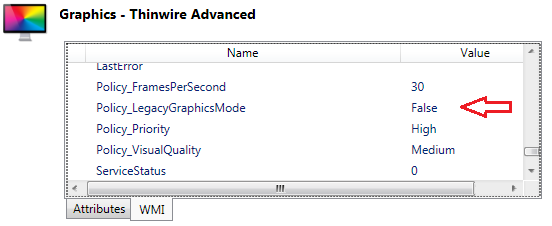
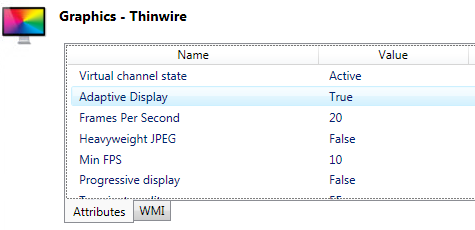
When you use the default graphics settings in XenDesktop 7 and you open HDX Monitor, you will see under Graphics – Thinwire that Adaptive Display is disabled (see below screenshot) and that thinwire redirection is disabled by a policy. This means that you are leveraging the new codecs and not using Adaptive Display first generation.
When you look at Graphics – Thinwire Advanced you will notice that the Legacy Graphics mode is turned off with the Legacy Graphics mode policy (see below screenshot).
 Ok so this is the default, now when user density and scalability is more important than the mobile user experience it’s possible to revert back to Adaptive Display first generation by enabling the Legacy graphics mode policy. Please note that you also have to switch off Desktop composition redirection to make this work. When you have done that you can verify that Adaptive Display first generation is back in business again through HDX monitor :
 You will also notice that, when using Windows 7, Aero functionality is switched off when using legacy mode:

For further fine tuning the legacy graphics mode in XenDesktop 7, read my previous blogpost on Adaptive Display.
Option 3 : Use Graphics Processing Units (GPU)
Instead of rendering and encoding everything in CPU, you can also leverage a GPU to do the heavy lifting, after all this is where a GPU is built for. Moving the graphical load away from the CPU, means you have more resources available for your applications etc making the solution more scalable. In XenDesktop 7 you have the following options :
– Leverage the GPU directly (Either physically or through the Hypervisor (GPU passthrough))
– Leverage the GPU indirectly through GPU virtualization (Available by using Nvidia GRID\VGX)
Leveraging the GPU directly is available for a while now but since it’s a one-to-one solution (except when using hosted shared desktops, where you can share a GPU with multiple sessions on the same server OS) it’s not very scalable and mostly limited to be used for heavy graphical designers and alike use cases. VGX on the other hand will extend the use cases by delivering a one-to-many solution. Personally I think this is the future because it provides the best combination of scalability, bandwidth and user experience. Let’s dig a bit deeper in VGX.
When we open HDX monitor in a XenDesktop 7 session you will see the below message when VGX is not available :

Screen scraping vs Direct frame buffer access
When you have a GPU available graphics are first rendered on the GPU before they are (deeply) compressed in CPU and then send down the client, so first the output of the GPU (which would normally be send to the monitor attached to it) needs to be captured and after that compressed and tuned, this process is called screen scraping.
Screen scraping, while better than doing everything in CPU, consumes additional resources and this is where Nvidia VGX (formerly known as Monterey and now called NVIDIA GRID technology) comes to play, they provide an API which allows remote display protocols to access the frame buffer (the dedicated H.264 encoding engine of the GRID card) directly. The below picture shows how the GRID technology is integrated on the Hypervisor level :
 (Source Nvidia)
NVIDIA User Selectable Machines (USM) (Now called VGPU Profiles)
USM is the way Nvidia licenses the GRID technology, you can also translate the USM to use cases. There are 3 configurable USM’s :
– Standard USM (bundled with the NVIDIA GRID card enabling a true PC experience for up to 100 task workers)
– NVS USM (mission-critical professionals who use a variety of productivity and dedicated business applications)
– Quadro USM (designers, artists, and scientists that require interactive 3D graphics and full compatibility)
So when you want to leverage the GRID virtualization technology you can do this for about 100 “normal” task users on a single GRID card (this can be less or more depending on the type of card and type of users), in this way you can already build a high scalable solution for general use cases. For more heavy graphical demands you need NVS USM or Quadro USM and this will cost additional licenses, good thing is you can mix and match the USM’s on a single GRID card. Of course the limits of the GRID card needs to be taken in to account. For more information about Nvidia GRID and the USM use cases click here.
XenServer will be the first hypervisor supporting GRID GPU virtualization, at this time of writing it’s not yet available but you can already order servers with GRID cards and leverage the onboard kepler GPU’s by using traditional GPU passthrough technology.
** Update **
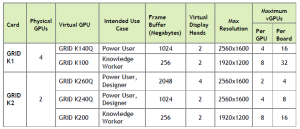
1 October 2013, Citrix and NVIDIA released the GRID VGPU (Tech Preview) and made some changes in names and numbers :
– USM is now called VGPU Profiles, where K100 profile being the lowest which supports a maximum of 32 VGPU’s per board (K1 Card) and K260Q being the highest, which supports 4 Power Users (designers) on a K2 Card.
– In the following table you will find the maximum VPGU per card.
– Cannot find anything on licensing, it looks like the above hardware limits are the only limitation in the tech preview.
Conclusion
In this blogpost I described the new graphics options and choices you have in XenDesktop 7, remember that you don’t have to configure anything to get an awesome experience out of the box. The CPU based deep compression codec is really a giant leap forward compared to the first generation of Adaptive Display especially when it comes down to mobile user experience and WAN use cases. As more Citrix Receivers supports the new codecs it’s really a fluid experience across a broad range of devices. But keep in mind that you need additional resources on your host side compared to the “legacy display mode”.
Personally I had the best experience with the visual quaility set to Build to Lossless and disabling the desktop composition redirection feature, of course this depends on the use case, what I primary tested was server rendered video (youtube) and the look and feel of the desktop over a high speed WAN connection. What also amazed me was the look and feel of Windows 8 on the IPAD with receiver 5.8, they really made a big step forward making it a native mobile experience and playing video content really performed very well using the new codecs.
Can we safely say that Adaptive Display first generation and progressive display become absolete?
Yes I think so, but for now there is still a valid use case : for example, when you want to get high density numbers and you have primarily LAN users Adaptive Display first generation still gives you the most scalable solution, but as CPU’s become faster and when GPU’s with GRID technology become more mainstream (also for general use cases), I think we can say goodbye to the good old progressive display after all those years.
Please note that the information in this blog is provided as is without warranty of any kind, it is a mix of own research and information from the following sources :
– Edocs (Optimize graphics and multimedia delivery in XD7)
– Edocs (GPU acceleration for Windows Desktop OS)
– Blogs from Derek Thorslund (reinventing HDX, HDX leaps ahead , GPU sharing and Optimizations for W8\W2012)
– Nvidia (GRID Technology, GPU Virtualization)