
It’s been a while since I wrote my last blogpost, so I thought it was about time to write a follow up regarding Citrix graphics!
Lets get back in time first, my previous 2 blog posts about Citrix display modes are still very relevant and will give you a good overview about :
- Adaptive Display (about finetuning legacy graphics mode)
- Graphical Deepdive (about new Thinwire graphics mode)
A while ago I started to write part 3 : How to configure, what to configure, when to configure. The main goal for this blog post was to give an understanding about all the display modes and related settings. Lets start with summarizing the available Citrix display modes we know today :
- Legacy Graphics mode (this includes the first Adaptive Display generation and the older progressive display technology)
- Thinwire Graphics mode (this includes the new H.264 video codecs (Pure H.264 and H.264 Optimized for text) and Thinwire plus, the latter is also known as Compatibility mode)
- Desktop Composition Redirection (combination of Thinwire graphics and Aero\DWM remoting to offload DirectX commands to the client)
- Framehawk (new graphics mode which is based on predicting technologies to optimize graphics for high latency connections (UDP based))
So the initial goal of this blogpost was to help understanding all of the policies and settings related to above display modes. When a specific setting applies and when not, etc.
In the meantime my colleague Barry Schiffer was also busy with this subject and had the idea to give a presentation together at E2EVC about the various display modes. Our goal was to give insight in the consumed resources of every display mode and help you decide which configuration would be the best fit for your environment. This is where the idea was born to develop a tool to show valuable information about the current display mode while running your remote workload in the background. This tool would be targeted to admins and not users.
When it comes down to configuring display settings one size doesn’t fit all, so I decided to stop writing the part 3 blog post and instead build out the tool so you can experience every display mode and settings for yourself. I think this tool will make you understand the display modes and its behavior even better then only reading about it!
Remote Display Analyzer
So this is how the Remote Display Analyzer project has started. The main goal of Remote Display Analyzer is to make the display modes understandable by showing only applicable information for the detected display mode. It helps you decide which configuration fits best in your environment and will help you detect miss configured settings and resource bottlenecks.

Imagine to take place behind your old thin client (which for example can’t be replaced because of tight budgets) and detect at which display configuration the user experience is optimal and in balance with the resource allocation. Or to check at which settings your branch office performance best, or just to get a better understanding about the behavior of a given display mode. Sounds great right?
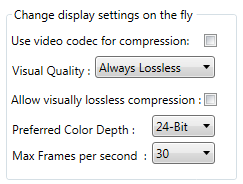
Over time the project evolved in much more then only showing you real-time information that matters, Remote Display Analyzer is also able to show you which settings you can change and change them on the fly!
This makes it possible to run your remote workload in the background and flip settings to get a deeper understanding of what is happening in real-time without having to logoff and configure different policies by yourself etc. Because the naming of the settings are the same as you find in the policies it’s easy to replicate the optimal settings in your production environment.
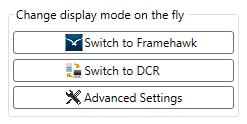
Besides live switching through settings, Remote Display Analyzer is also able to switch between display modes. For example you can live switch between Thinwire and Framehawk and from Thinwire to Desktop Composition Redirection(DCR) and vice versa when your client and VDA supports it.
Enough talking try it for yourself, hopefully you like it!
Availability
Remote Display Analyzer is available in 2 editions :
- Lite edition, which gives you the ability to view display settings and real-time analytics
- Sponsored edition, which provides all the functionality of Remote Display Analyzer like changing settings on the fly and advanced settings
Of course I hope to welcome you as sponsor of the project to even add more functionality in the future and to keep Remote Display Analyzer up to date. For more information about sponsoring and downloading Remote Display Analyzer please visit the website : www.rdanalyzer.com.
Thanks for reading!
