Citrix Display modes: How to configure, what to configure, when to configure

graphics

It’s been a while since I wrote my last blogpost, so I thought it was about time to write a follow up regarding Citrix graphics!

Lets get back in time first, my previous 2 blog posts about Citrix display modes are still very relevant and will give you a good overview about :

A while ago I started to write part 3 : How to configure, what to configure, when to configure. The main goal for this blog post was to give an understanding about all the display modes and related settings.  Lets start with summarizing the available Citrix display modes we know today :

  • Legacy Graphics mode (this includes the first Adaptive Display generation and the older progressive display technology)
  • Thinwire Graphics mode (this includes the new H.264 video codecs (Pure H.264 and H.264 Optimized for text) and Thinwire plus, the latter is also known as Compatibility mode)
  • Desktop Composition Redirection (combination of Thinwire graphics and Aero\DWM remoting to offload DirectX commands to the client)
  • Framehawk (new graphics mode which is based on predicting technologies to optimize graphics for high latency connections (UDP based))

So the initial goal of this blogpost was to help understanding all of the policies and settings related to above display modes. When a specific setting applies and when not, etc.
In the meantime my colleague Barry Schiffer was also busy with this subject and had the idea to give a presentation  together at E2EVC about the various display modes. Our goal was to give insight in the consumed resources of every display mode and help you decide which configuration would be the best fit for your environment. This is where the idea was born to develop  a tool to show valuable information about the current display mode while running your remote workload in the background. This tool would be targeted to admins and not users.

When it comes down to configuring display settings one size doesn’t fit all, so I decided to stop writing the part 3 blog post and instead build out the tool so you can experience every display mode and settings for yourself. I think this tool will make you understand the display modes and its behavior even better then only reading about it!

Remote Display Analyzer

So this is how the Remote Display Analyzer project has started. The main goal of Remote Display Analyzer is to make the display modes understandable by showing only applicable information for the detected display mode. It helps you decide which configuration fits best in your environment and will help you detect miss configured settings and resource bottlenecks.

Imagine to take place behind your old thin client (which for example can’t be replaced because of tight budgets) and detect at which display configuration the user experience is optimal and in balance with the resource allocation. Or to check at which settings your branch office performance best, or just to get a better understanding about the behavior of a given display mode. Sounds great right?

Over time the project evolved in much more then only showing you real-time information that matters, Remote Display Analyzer is also able to show you which settings you can change and change them on the fly!
This makes it possible to run your remote workload in the background and flip settings to get a deeper understanding of what is happening in real-time without having to logoff and configure different policies by yourself etc. Because the naming of the settings are the same as you find in the policies it’s easy to replicate the optimal settings in your production environment.

Change display settings on the fly

Besides live switching through settings, Remote Display Analyzer is also able to switch between display modes. For example you can live switch between Thinwire and Framehawk and from Thinwire to Desktop Composition Redirection(DCR) and vice versa when your client and VDA supports it.

Change display mode on the fly

Enough talking try it for yourself, hopefully you like it!

Availability

Remote Display Analyzer is available in 2 editions :

  • Lite edition, which gives you the ability to view display settings and real-time analytics
  • Sponsored edition, which provides all the functionality of Remote Display Analyzer like changing settings on the fly and advanced settings

Of course I hope to welcome you as sponsor of the project to even add more functionality in the future and to keep Remote Display Analyzer up to date. For more information about sponsoring and downloading Remote Display Analyzer please visit the website : www.rdanalyzer.com.

Thanks for reading!

What’s new in App-V Scheduler 2.3

Introduction
It’s exactly a year ago that App-V Scheduler 2.0 was released in its current form and today we are very excited to announce the latest release of App-V Scheduler, version 2.3.
If you are reading about App-V Scheduler for the first time: App-V Scheduler is a purpose build App-V 5 deployment tool specially designed for virtual workloads like RDS\XenApp and VDI environments. The power of App-V Scheduler is the amount of fine grained control, instant package delivery and real-time visibility over your App-V 5 deployment. To name some advantages of App-V Scheduler :

  • Support for both persistent and non-persistent environments (Citrix PVS\MCS integration)
  • Advanced cache management (Cleanup, auto balance cache with source and selectively pre-cache packages)
  • Improve application launch time with virtual registry pre-staging and application pre-launch feature
  • Packages and Connection groups available at machine startup and ongoing through deploy cycle
  • Complete application life cycle management; from instantly deploying packages to draining and retire applications without touching your image
  • Real-Time (portable) remote management console (inventory, manage and central configuration)
  • No App-V full infra components needed (dramatically simplify your deployment)

In this blog post we will walk through the most important new features in App-V Scheduler 2.3, to read more about existing features click here.

What’s new in the App-V Scheduler agent
Let’s start with the new managed publishing mode which can be configured in the App-V Scheduler agent configuration window :

Publishing mode

When managed mode is enabled you can use App-V Scheduler Central View to create publishing tasks (see screenshots later on in this post). Both global and user publishing tasks are supported. Global publishing tasks are executed when the deploy cycle runs and user publishing tasks are executed when a user logs in to the machine, this is done directly by the App-V Scheduler agent service so no need to execute anything in the user context. Optionally user publishing tasks can also be refreshed when the deploy cycle runs allowing you to publish new applications while users are logged on to the machine. Multi domain environments are supported and there is also an option to enable nested group support.

In unmanaged mode, App-V Scheduler will publish all packages globally by default so you can use User Environment Management (UEM) tools for example to control access to the applications.

A new feature called pre-stage virtual registry is now added to the deploy cycle :

Pre-stage virtual registry

This option can invoke the staging of the virtual registry right after the package is added, normally this is done when the application is launched by the user for the first time causing launch delays and unnecessary CPU utilization. App-V Scheduler already logs the amount of time it took to add and publish a package and this is now also done for the registry pre-stage feature:

Pre-stage log

What’s new in App-V Scheduler Central View
Packages and connection groups are now displayed in the same overview making it easier to navigate and manage them. The per machine options are now all displayed in the group view :

Central View console

The Central View console is now multi-threaded, this means if you inventory multiple machines at the same time or remove packages on multiple machines at the same time this will go much quicker. All tasks and their status is shown in the background tasks window :

Background tasks

The package options window is now extended with the new publishing task options (used when App-V Scheduler agent is running in managed mode). You can create new or show existing publishing tasks of the selected package directly from here :

Package Options

When you create a new publishing task you can select the publishing type :

Publishing Type

User groups can easily be selected with the active directory object picker :

Object Picker

You can also show and manage all publishing tasks at once when clicking on the Show Publishing Tasks button in the Central View main window :

Show Publishing tasks

The create new connection group option is extended with the latest App-V 5 SP3 enhancements like the any version wildcard and possibility to set a package as optional :

SP3 Connection Group

Availability
App-V Scheduler 2.3 is now available on the App-V Scheduler website.
Thanks for reading! If you have any questions do not hesitate to contact us.


App-V 5 Scheduler, an easy way to deploy App-V 5 applications to your machines

app-v-5-scheduler-logo

Please note : App-V Scheduler 2.0 has been released, read more about it here

Introduction

I think it didn’t escape you but Citrix is leaving the application virtualization space, they announced that they will not further enhance and support their streaming technology on newer platforms (that is XenDesktop 7 and Windows 2012\8). A lot of customers are starting to look at App-V 5 as a replacement, but also new and customers currently on App-V 4.X are looking to benefit from the latest improvements in the App-V product. App-V 5 can be deployed and managed in the following 3 ways:

  • App-V 5 Full infrastructure (Management, Publishing and optional a report server)
  • System Center Configuration Manager (SSCM) integration
  • Standalone

The first 2 have their place and advantages, no doubt about that, but they also come with their prerequisites (like full SQL etc) and need to fit in the customers environment. Most customers I work with are using UEM (User Environment Management) tools and most of them from RES Software (Workspace manager). They want a simple method to deploy and upgrade their virtual applications and manage them with RES Workspace manager. They don’t want an extra management layer, that overlaps in functionality and adds complexity, that’s why I often used the streaming only method in App-V 4.x and with Citrix application streaming (while it had its limitations) it was even more simple : just place the profiled application on a share and import it in RES Workspace Manager, that’s it.

With this in mind I created App-V 5 Scheduler, which extends the standalone deployment method by allowing you to automatically deploy packages and connection groups on machine level with a configurable time interval. But it can do more, I will dig deeper in App-V 5 Scheduler in a sec, but first I want to note you on another great tool that’s build around the App-V 5 standalone method by well-known App-V guru Tim Mangan. This tool is called App-V Self Service and provides users with a self-service portal where they can select and deploy packages (without needing admin rights), App-V Self Service can also deploy packages automatically at user login based on AD group membership.
If you are looking for a solution to deploy packages to users and don’t want to implement the App-V 5 full infrastructure, I would highly recommend looking at this tool.

App-V 5 Scheduler takes a slightly different approach, where App-V Self Service uses deployment based on users and is triggered when a user logs in, App-V 5 Scheduler uses machine level deployment and therefore fits best in environments that uses UEM products like RES Workspace Manager to control and manage the applications and the users workspace.

App-V 5 Scheduler can also remove packages on machine start-up to keep the package installation root clean and in case you use Citrix Provisioning Server (PVS) or Machine Creation Services (MCS) it can detect when the image is in private mode so it will not deploy packages filling up your image accidently.
To keep it simple I made App-V 5 Scheduler scenario driven, it’s only necessary to select the scenario that fits your environment best. I will explain the scenarios later on but first a quick look at the base of App-V 5 Scheduler, App-V 5 Scheduler consists of 2 components : 

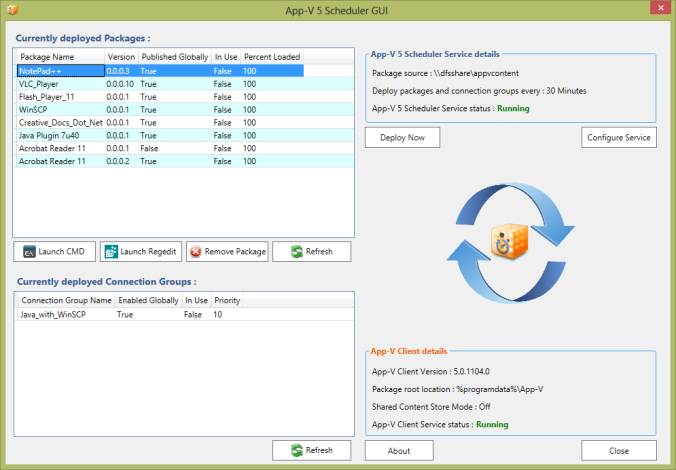
The App-V 5 Scheduler GUI

The GUI will allow you to see which packages and connection groups are currently deployed to the machine, it will also allow you as an admin to do some troubleshooting steps like opening CMD or Regedit inside the virtual application context (or bubble or sandbox, whatever you like to call it ;). The GUI also displays basic information about the App-V client configuration and will allow you to configure the App-V 5 Scheduler Service. Below is a screenshot of how the App-V 5 Scheduler GUI looks like:

App-V 5 Scheduler GUIThe App-V 5 Scheduler Service

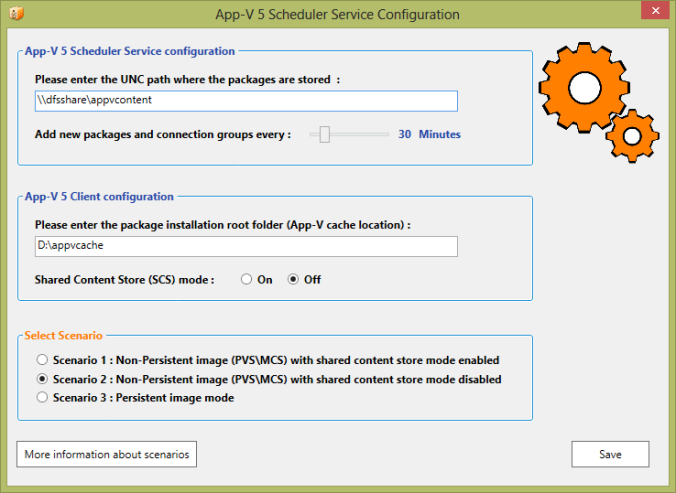
The service will deploy new packages and connection groups which are added after the last system start-up based on a configurable time interval. Depending on the selected scenario the service can detect when the image is in read\write mode to prevent the deployment of packages. Below is a screenshot of the App-V 5 Scheduler Service configuration dialog :

App-V 5 Scheduler Service dialog

Scenario 1 : Non-Persistent image with shared content store mode enabled

Select this scenario if you use Citrix Provisioning Services (PVS) or Citrix Machine creation Service (MCS) for single image management and you want to leverage the Shared Content Store (SCS) functionality of App-V 5 to lower the storage needed for package content. This scenario will configure the service to do the following :

  • Remove packages and connection groups at machine start-up to keep the package root clean
  • Deploy packages and connection groups after machine start-up
  • Deploy only new packages and connection groups based on the configured time interval
  • Publish packages and connection groups globally on the machine
  • Don’t remove or deploy packages when the image is in private mode

In this scenario you can redirect the App-V package root location outside the image (write cache disk for example), but since you are leveraging the App-V Shared Content store mode, a minimal amount of storage will be used in the package root so you could decide to keep it in the primary location.

Scenario 2 : Non-Persistent image with shared content store mode disabled

Select this scenario if you use Citrix Provisioning Services (PVS) or Citrix Machine creation Service (MCS) for single image management and you want to deploy the packages in its full size to the App-V package root location. This scenario will configure the service to do the following :

  • Remove packages and connection groups at machine start-up to keep the package root clean
  • Deploy packages and connection groups after machine start-up
  • Deploy only new packages and connection groups based on the configured time interval
  • Publish the packages and connection groups globally on the machine
  • Pre-Cache (mount) the package inside the package root location
  • Don’t remove or deploy packages when the image is in private mode

In this scenario you can also redirect the App-V package root location to another location (outside the image for example), this is advisable if your write cache location is limited and you want to keep it small.

Scenario3 : Persistent image mode

This scenario is very similar to scenario 2 only it will not check if the image is in private mode or not, select this scenario if you have persistent machines where you want to deploy App-V 5 packages to.

This scenario will configure the service to do the following :

  • Remove packages and connection groups at machine start-up to keep the package root clean
  • Deploy packages and connection groups after machine start-up
  • Deploy only new packages and connection groups based on the configured timer interval
  • Publish the packages and connection groups globally on the machine
  • Pre-Cache (mount) the package inside the package root location

Which scenario is best depends on your environment, key factors are the size of your packages and the amount of storage you have available. Scenario 2 and 3 will give you the best overall performance because the applications are fully mounted to the machines lowering bandwidth consumption and eliminating network bottlenecks. That’s why I would recommend this scenarios when you use a shared platform (RDS\XenApp). Besides better performance it will also make the virtual application higher available since they don’t rely on the content share after being deployed. Since scenario 2 and 3 mounts the package there is no load time at all when users start the application.

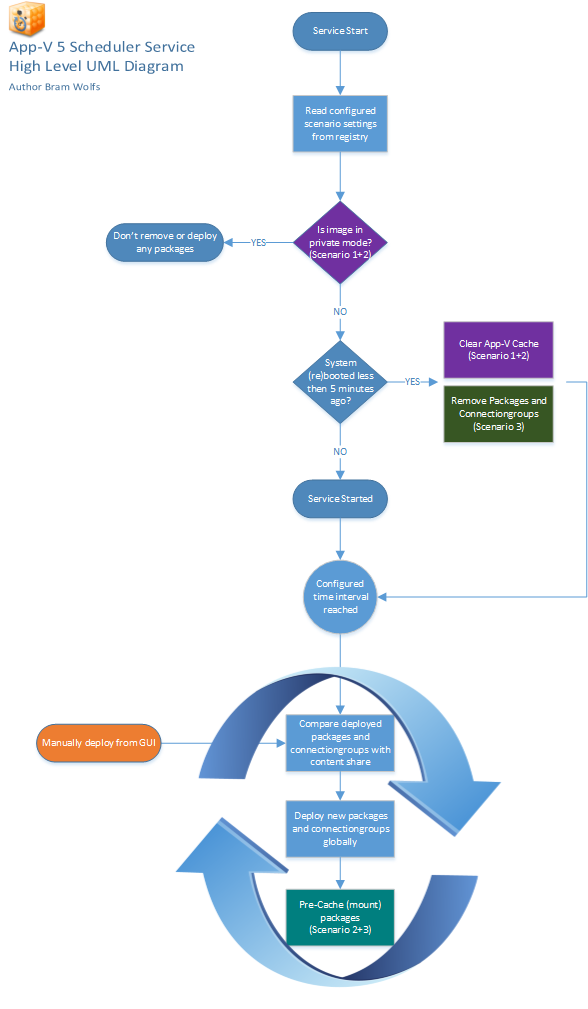
Below you will find a high level UML diagram of the App-V 5 Scheduler Service :

Service_UML

Deploying connection groups with App-V 5 Scheduler

Connection groups are basically XML files filled with information of which packages that can connect to each other, Tim Mangan created a very useful tool to create connection groups called App-V DefconGroups. With this tool you can easily select packages that you want to connected to each other. You can save the output file (with the AppG extension) somewhere on the package source location and App-V 5 Scheduler will deploy it to the machine (globally) for you.

Logging

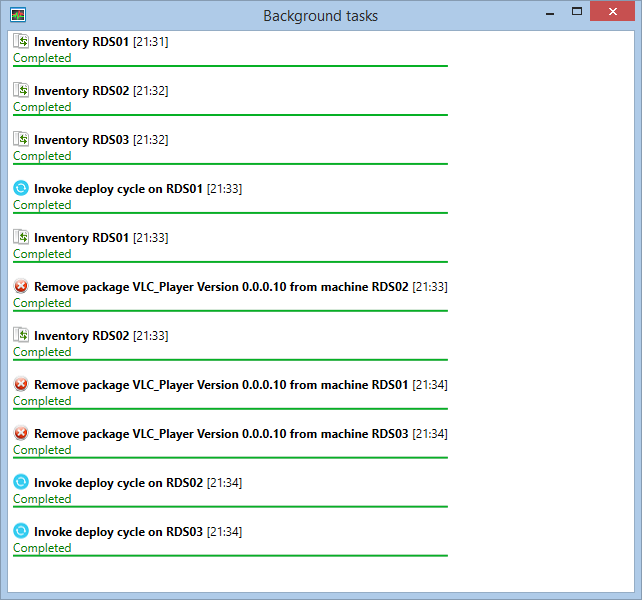
App-V 5 Scheduler Service logs its actions in the event viewer and will give you information about the packages that are removed or deployed and the status of the service. For troubleshooting purposes it’s the place to look at because all other operational events are logged there as well. Below is an example message in the event viewer when private mode is detected :

Events


Conclusion

App-V 5 Scheduler, in combination with an User Environment Management tool like RES Workspace Manager, is a powerful and simple way to deliver packages to your machines without the need for a full App-V 5 infrastructure model. Just place the package on a share and App-V 5 Scheduler will do the rest for you. If you use the App-V 5 integration in RES Workspace Manager and you have imported the application once, it will look up the newest version of the package automatically. You only have to place the updated package on the share and after App-V 5 Scheduler deployed the new version to the machine it’s immediately available to your users, they only need to close and reopen the application to get the latest version. App-V 5 Scheduler GUI will give administrators an overview of the current deployed packages on the machine and allow them to open CMD or Regedit to perform basic troubleshooting steps inside a virtual application.

What’s coming

To complement App-V 5 Scheduler, I will also release a tool called App-V 5 Central View. This tool allows you to select an Active Directory group (with machine accounts) and it will give you an overview of the currently deployed applications on that machines. In combination with some basic management tasks, this tool will give a central point of view of which applications are deployed through your environment. App-V 5 Central View is in depended of App-V 5 Scheduler and can also be used without it, but will form a great combination together.

Availability

App-V Scheduler 2.0 has been released and has a lot more features and enhancements, click here to read more.

UDadmin GUI a free tool to manage XenDesktop User\Device Licenses

UDadmin_GUI_logoPlease note: This tool isn’t available anymore

Background
Since the new licensing model for Citrix XenDesktop, which is based on named users and devices, I have customers asking questions like :

  • We are running out of licenses but how do we know which users or devices claimed them?
    XD Usage overview
  • We have a tight budget and don’t want to buy any more licenses then strictly necessary, how can we get better control and insight in the current usage?
  • What is the balance between User licenses and Device licenses?
  • We created some temporary accounts for testing purposes, how can we release them?
    remove_user

UDadmin commandline tool
Citrix provides a command line tool named UDadmin to control the license usage, it’s part of the Citrix Licensing server software and installed by default. You can find it in the LS directory of your license server installation directory. With this tool you can view and reclaim licenses, but it’s not really user friendly mainly because it runs in a cmd box and it requires the right parameters. To provide something easier to this customers I created a GUI around UDadmin :

UDadmin GUI
UDadmin GUI is a lightweight .NET application that visualizes the output of UDadmin, and provides an easy way to release single- or multiple licenses at once, just select them and hit release. I also added some additional features like exporting the current usage to PDF for reporting purposes. When you launch UDadmin GUI it determines the licensed feature for you, no configuration is required at all. Below is a screenshot of UDadmin GUI in action :
UDadminGUI The XenDesktop named license usage is updated every 15 minutes, in UDadmin GUI you can see when the next update schedule occurs (in blue). So after releasing licenses the changes are reflected when the next update schedule runs. If you don’t want to wait that long there is also an option in UDadmin GUI to restart the Citrix Licensing service to reflect the updated usage directly afterwards :
UDadminGUI_restart_ls Prerequisites
There are only 2 prerequisites

  • Microsoft .NET Framework 3.5
  • Citrix License Server installed (UDadmin GUI is tested with version 11.10 and 11.11, but every edition which supports the new licensing model should work)

In other words, you need to run UDadmin GUI on the same machine as where Citrix License Server is running, this is because Citrix doesn’t support running UDadmin remotely. UDadmin GUI works with XenDesktop Enterprise and Platinum edition, support for App edition will be included in a future version (very soon!).

Just like the UDadmin command line tool, UDadmin GUI needs administrative privileges to run properly. But don’t worry UDadmin GUI is UAC aware and will prompt you when necessary.

Availability
UDadmin GUI isn’t available and supported anymore at the moment. Sorry for the inconvenience.

Version history

= 1.0 =
– Initial version

= 1.1 =
– Multiple fixes and enhancements

= 1.2 =
– Added an option to restart the Citrix licensing service and refresh usage afterwards

= 1.3 =
– Added export to PDF functionality

= 1.4 =
– Changed the window layout so UDadmin GUI also looks good on lower screen resolutions
– Added support for multiple license files and SA dates

– Added support for mixed XenDesktop Editions (both Enterprise and Platinum on same license server), if UDadmin GUI detects multiple editions a Combobox is visible to switch between editions :
Edition selection
= 1.5 =
– Added support for XenDesktop VDI Edition
– Fixed an issue with releasing user\device licenses which contains whitespaces

= 1.6=
– Added support for XenApp Advanced Edition (named licensing model)
– This version can only release one license at a time to be compliant with Citrix licensing terms
– This version is portable, just place and run the executable on your Citrix license server