Extended App-V 5 integration in RES Workspace Manager 2014 SR2, how does it work?

Intro
With the release of Workspace Manager 2014 SR2 (WM from now on), RES has extended the App-V 5 integration making it possible to automatically Add and Publish a package inside the user context. WM does this with evaluated permissions since the user doesn’t have the permissions to add App-V 5 package itself, the add and publish is executed when the user clicks on the application for the first time making it a Just in Time (JIT) deployment method. I have been involved in the pre-stage of this feature and would like to discuss how it works and how it differentiates from App-V Scheduler.

How does it work?
The concept is pretty simple, there are a few options added in the console after you select the .appv file :

  • Package delivery mode
  • Always use the latest version of the package

Package delivery mode allows you to select 3 available options : None, Minimal and Full (both user publishing and global publishing can be selected).
Below you will find a screenshot of how the package delivery option looks like :

Package Delivery Mode Small

When you select None, WM will not add and publish the package and you can use another delivery method like App-V Scheduler or the App-V native infrastructure for example to take care of the deployment. This option still makes use of the App-V 5 integration options in WM like the version variable (to detect the latest package version) and inject\capture user settings.

When you select Minimal, WM will add and publish the App-V package when the user clicks on the application for the first time and will show the following message to the user  :

Prepared Message

WM will add the package without using the mount option, so the package will be streamed just like how it’s configured during sequencing.
After the package is added and published the following message is displayed :

Finished Message

After the user clicks yes the application is launched, depending on the streaming settings of the package you may see the App-V progress bar notifying the application is getting streamed :

Loading2
When you select Full, the exact same process happens as with the minimal option, but the difference is the package gets 100% loaded (mounted in the background) when the application is launched.

The Always use the latest version of the package option will instruct WM to scan the .appv files in the folder of the package (and up to 2 subfolders below in the package folder), if WM finds a newer version of the package it will try to deploy it and will show the following message to the user :

Update Message

This update process also happens in the user context when the user clicks on the application.

In my opinion global publishing makes more sense in combination with UEM tools, because then you can manage the application the same way as they where installed natively (access and control etc) and you don’t have to publish the package for every user making it faster and less entries in the user registry.

Conclusion
I don’t know any UEM products that has such deep integration with App-V 5 as RES Workspace Manager, RES was one of the first to integrate with App-V 5 and with the extended integration in SR2 there is now also a very easy way to (optionally) add and publish a package. But one can ask itself if the user context is the right level to deploy the packages for their environment as it can take a while for the application to become available and it can cause numerous messages to your users that just want to launch the application as quickly as possible. Also it can be difficult to make use of new extension points in App-V 5 (like shell extensions and browser plugins) because the package isn’t deployed initially before it’s started for the first time.

How does this feature compare with App-V Scheduler
Because WM uses a just in time deploy method that runs in the user context and App-V Scheduler deploys directly when the machine boots and based on a configurable timer or centrally controlled by App-V Scheduler Central View they cannot be really compared with each other. Also the WM App-V 5 deployment option is only available in the silver\gold editions of Workspace Manager where App-V Scheduler is available in a free community edition and can also be used with other UEM tools or even without UEM tools as well. App-V Scheduler also addresses the following challenges which are out of the scope of the RES WM deployment option :

  • Cache management for non-persistent use cases (PVS\MCS)
  • Cache management for persistent use cases (automatic clean-up of older package versions to control cache size and remedation of applications)
  • Instant application access by adding and selectively mounting packages at machine start-up (to append to non-persistent images for example)
  • Support for connection groups
  • Support for deployment configuration files
  • Real-time central management of App-V 5 packages, connection groups and virtual processes on multiple machines
  • And more… Click here to read more about the App-V Scheduler features

Just like App-V Scheduler, this new WM feature reduces complexity (less scripting etc) and more granular control compared to other deployment options, but depending on your scenario keep above points in mind when deploying and managing App-V 5 applications.

App-V Scheduler 2.0 Release

app-v-5-scheduler-logoApp-V Scheduler

Introduction
You may have heard about the App-V 5 Scheduler project, if not you can read more on how everything started in this previous blogpost. In short the vision of App-V Scheduler is to reduce complexity and make the deployment and management of App-V 5 packages in RDS & Citrix environments easy. No need for complex PowerShell scripts with limited functionality and visibility, also no need for full infrastructure components like App-V Management and Publishing servers or System Center Configuration Manager.

App-V Schedulers goal is to deploy App-V 5 packages on a machine level and manage them the same way we do with natively installed applications and this is where user environment tools like RES Workspace Manager comes to play. The power of such tools is that we can control application access and configuration from one single console, without having to configure application access and settings on multiple levels and in multiple consoles. I will explain the powerful combination of App-V Scheduler and RES Workspace Manager later on in this blog post. First let’s have a look at the new App-V Scheduler 2.0 version.

App-V Scheduler Editions
To start with App-V Scheduler is now available in 2 editions : Community and Enterprise edition.

Community Edition
Community edition provides the same functionality as the previous 1.3 version, this means automatically deployment of packages and connection groups, multiple cache options, aware of single image management technology like MCS\PVS and with this new release the community edition also comes with the redesigned GUI :

GUI_Version2

As you can see you have a very clear view on which packages and which versions are deployed on the machine, the package size is displayed in a readable format and on the bottom left you can see the total size of all packages currently loaded. When you select a package you can remove it manually, or launch CMD\Regedit inside the virtual environment for troubleshooting purposes. You can also directly launch the application from here to test its functionality. There is an administrator guide attached to the download which goes further into technical details, be sure to read it before installing.

Enterprise Edition
Enterprise edition will add the following features on top of community edition :

Pending Tasks support
When an updated package is deployed while the previous version is in use, the App-V client will create a pending task. For global publishing this means the pending task will be processed when the machine reboots. This is not desirable when you want to deploy a new version during the day. App-V Scheduler detects pending tasks and will process the pending task automatically when the package is no longer in use. You only have to ask the user to close the application. All of the processing is automatically done by the App-V Scheduler service, no need to leave the GUI open, you will get an overview of pending tasks by clicking on the Pending Tasks button :

PendingTasks2

Virtual Process overview
Quickly get an overview of all virtual processes on a machine, also native processes started inside a virtual environment are shown here. You can see which user(s) are associated with the virtual process and the path where the executable is started from. You can also end virtual processes from here. Virtual process overview is very handy in combination with pending tasks, it allows you to easily see which users\processes keeps the package in use.

VirtualProcesses

Package Details
Package details gives you a clear view on which extension points are registered for a given package. The output is filtered so you will only see the information that is applicable to the selected package. With the blink of an eye you can see which shortcuts, file type associations, services, ActiveX and other com objects are registered in a readable and understandable format. Also extension points like browser plugins and shell extensions are shown here. App-V 5 comes with a lot more extension points than its predecessor, its important to know how a package is integrated in the OS to understand the behaviour of the application. The auto generated commandline hook switch can be used as a parameter for native processes to launch them inside the virtual environment of the package, think of Excel addins etc. In the RES Workspace Manager part I will give you an example on how to configure this.

PackageDetails

There is also a details button to zoom further into the extension point details like this :

Package_details_service

Central management console
Part of Enterprise edition is also a lightweight (portable) central management console called Central View where you can centrally manage packages on multiple machines. For example you can see which packages are currently deployed and in use, you can also update packages by invoking a remote deploy process and view pending tasks remotely. The central management console will form a great combination together with App-V Scheduler but can also be used without it, for example if you decide to deploy packages in another way.

Central_Management_Console

Support and software assurance
Part of Enterprise licensing is free support and upgrades to the latest versions for the first year, the subscription can be renewed on an annual basis for a fraction of the price. App-V Scheduler is being actively developed and new features are added frequently. Compatibility with future App-V 5 releases and service packs will also be assured.

support1

App-V Scheduler in combination with RES Workspace Manager
After App-V Scheduler deployed a new package, we can configure the application in the RES Workspace Manager console by leveraging the App-V 5 integration. All we have to do is select the .appv file and the integration will take care of :

  1. Dynamically locate the package installation root (App-V Cache location, which can be configured directly in App-V Scheduler)
  2. Dynamically select the latest version of a package that is deployed, so you never have to worry about changing paths after a version upgrade
  3. Load application settings inside the virtual environment (think of registry values, files and folders, etc)

Below you will find a screenshot of the App-V 5 integration in RES Workspace Manager :

RES_WM_Appv5_Integration

As you can see it’s really easy to integrate App-V 5 applications in RES Workspace Manager, but how can we integrate a natively installed application with a virtual application? We could use great new App-V 5 technics like run virtual or dynamic virtualization. But if we want to do this more selectively? let’s say an Excel addin for a group of users? This is where the command line hook switch comes in handy which App-V Scheduler automatically generates when you open up the package details. All you have to do is hit the copy to clipboard button and paste it in the parameters field of the native application :

CommandLineHookSwitch

Finally configure access to a select group of people and that’s it. You can open the virtual process overview to check if Excel runs virtualized.

Conclusion and availability
App-V 5 Scheduler, in combination with an User Environment Management tool like RES Workspace Manager, is a powerful and simple way to deliver packages to your machines without the need for a full App-V 5 infrastructure model or complex scripting. Just place the package on a share and App-V 5 Scheduler will do the rest for you.
Community edition already gives you a good starting point to simplify the App-V 5 deployment in your environment, Enterprise edition features will make the management of App-V 5 packages a breeze and there are more features to come.

How to get Enterprise Edition ?

Thank you! It would be great if you consider to upgrade to Enterprise edition, besides the additional features, this will also support the further development of App-V Scheduler.

App-V Scheduler 2.1 released!

Please visit the App-V Scheduler 2.1 release blog post for the availability and more information about the new version.

3 tips to harden your XenApp\RES environment

safe** This post was updated on 13-5-2013 and contains, besides additional information, also statements from RES Software. They responded very quick on the outcome of the security audit and would like to thank them for the nice collaboration **

Lately I was involved in a security and penetration scan at a customer servicing in Healthcare, because they store privacy sensitive information they need to apply to certain security regulations which are audited on a regular basis. Based on the results of this scan I will provide some findings and tips that you can use to further enhance the security of your XenApp environment. This tips are primarily focused on XenApp in combination with RES Workspace manager, but elements can also apply to other environments containing other UEM products.

Lets begin with a short description about the security scan :
The scan was performed by a company specialized in IT related security audits, you can also say the scan was performed by a group of legal hackers 😉

The security scan consisted of 3 parts :

1: Scan from an unauthorized internal perspective  (plug in the UTP cable and see how far you can get without any account)
2: Scan from an unauthorized external perspective (try to gain access from outside the corporate network trough external components)
3: Scan from an authorized user perspective (logged in with standard user credentials and see what kind of damage can be done)

Part 1 consisted of multiple scans for weaknesses like missing patches and gathering NTLM hashes to decrypt passwords etc, keypoint here is to consider disabling cached credentials for internal pc’s which doesn’t leave the building or limit the amount of cached credentials (the default is 10 cached credentials on Windows). And of course use strong passwords so when they have access to the hashes the decryption is very time consuming. They use different tools and methods to decrypt hashes, one of them is John the Ripper and pre calculated rainbow tables. When they got access to the password hashes its amazing (and scary) how fast the hash can be decrypted into a plain text password.

Part 2 consisted of a DNS lookup to gather information about external accessible elements of the infrastructure, after they are identified they try to logon using default user names and passwords and scan for other weaknesses. This customer uses Netscaler in DMZ in combination with SMS Passcode authentication, so they didn’t come far on that part. What should be taken into account is webmail\active-sync traffic (which often doesn’t have 2-factor authentication) in combination with password lockout policies, a hacker can perform a denial of service by trying lots of different usernames and wrong password to intentional block users in AD (especially admin accounts).

Part 3 consisted of tests on the XenApp environment while logged in with a normal user account, the following tips are derrived from findings in this part of the scan.

Tip 1: Timing

The first tip is about timing, if you are like me you want to put all of the user environment settings such as policies, registry and application settings as much as possible in RES Workspace Manager. If you are configuring things outside Workspace Manager, you lose the single point of management and that’s one of the key points the customer invested in RES Workspace Manager.
Well there is absolutely nothing wrong with that, but I will give you an example to think about when security is high on your design checklist.

Imagine that the company’s policy is to block the task manager from running in a user session, to do this you can import the CtrlAltDel.admx policy in RES Workspace Manager and disable the Task manager there. This policy backed with the fact you have appguard running in the background to block all unauthorized processes (so also task manager) you should assume it’s absolutely not possible to start the task manager inside the user session, at least I thought so till a saw the security report that proved otherwise…
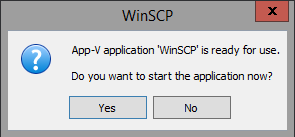
What they did was fairly simple, consider that RES Workspace Manager by design removes all policies at logoff and that it takes some time (seconds) that the policies are applied and before appguard is fully functional when a user logs on. While the workspace composer does its magic, it seems possible to start the task manager through the CTRL-F3 hotkey right after the session is launched (press the hotkey repeatedly after the session is launched). See the following screenshot how this looks like.

WM_Timing

After Task Manager is launched, RES Workspace manager completes the workspace with all policies and rules so starting any unauthorized processes through task manager isn’t possible, but users can see information you rather want to hide (like performance, who is logged on etc). But besides that when you click on browse in task manager before the Workspace Composer applies the drive restriction settings it is possible to browse the C Drive even when you strictly prohibited this in RES Workspace Manager :

browsing

Workaround :

If you (or your customer) don’t care about users accessing task manager and local drives, there is absolutely nothing you have to do here, but if the company’s policy is to strictly hide task manager and to hide and prevent access to local drives, you can do the following things to overcome this timing issue :

–  Apply the task manager policy through AD, this policy is applied in an earlier stage when a user logs on so passing the hotkey at session creation has no effect
–  Consider using desktop viewer, if you use desktop viewer it’s not possible to pass hotkeys
–  Modify the default ica file on the Webinterface\Storefront server and disable hotkeys there (Thanks Kees Baggerman for pointing this one out!)

RES Software statement :

The timing issue with taskmanager will be fixed in a upcoming service release of RES Workspace Manager, expect a custom executable to test with shortly.

Tip 2: Macro security

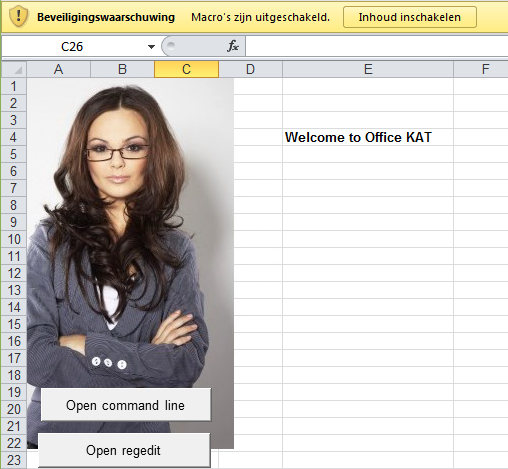
Another way to bypass the application guard is to run processes inside memory of other (allowed) processes. This is often done through Office, because most of the time this processes are marked as trusted and malicious code can be easily fired of using macro’s. The Office KAT excel sheet (sources are at the bottom of this post) is an example of a sheet containing such macro’s. When opening Office KAT in a user session with default office settings, the user is prompted to allow the macro’s (message is in Dutch but it says : warning macro’s are turned off, enable content to turn them on) :

Office KAT

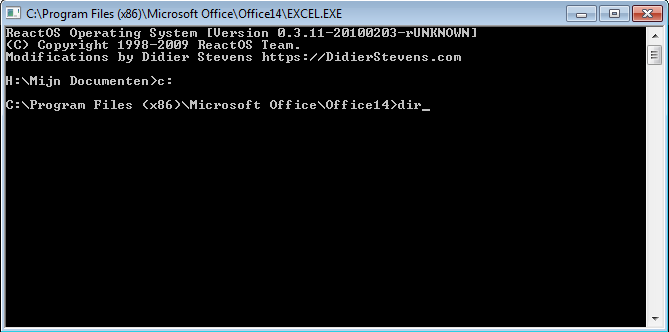
When the content is enabled, we click on “open command line” and we are prompted with the following message :

run_in_memory

After clicking OK, the command prompt is started, in the following screenshot you can see that the actual process is Excel.exe, you can also see that we can easily switch to the C drive and browse through the contents of the XenApp server (note that drive restriction policy are ignored) :

cmd_content

(Please note that this user session hasn’t got access to the command prompt and that access to local drives are strictly prohibited).

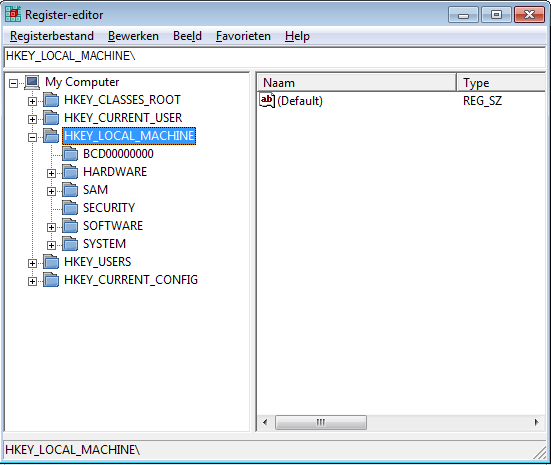
And when we click on “open regedit” from Office KAT, which launches a registry editor under the Excel.exe process, you can see how simple it is to browse the whole registry of the XenApp server :

regedit

After chatting with Kees Baggerman about this topic, he pointed me to a similar Excel macro from Remko Weijnen, Remko was the first pointing out that there was a way to bypass the application guard by running untrusted processes in memory of authorized processes using a Excel macro. You can read about it here. This was one of the reasons that RES tightened the security rules of the application guard driver, they did this by blocking the svchost process from running other (unauthorized) processes indirectly. This security enhancement is available since Workspace Manager 2011 SR4, the following rule is created (and disabled) by default in new RES Workspace Manager deployments :

svchost

Note : Check this rule out if you upgraded your environment till this point, because during upgrade the rule is created and enabled by default, this is done to avoid security warnings thrown at your users after the upgrade, you can run the rule in logging mode for a while to identify what the impact will be in your environment. So if you want to harden your environment you should disable this rule.

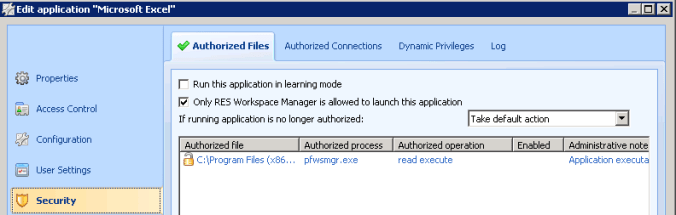
Another way to tighten the security of your RES environment is by restricting a managed application to be only launched by Workspace Manager itself (see below screenshot). This prevents the managed application to be launched through other applications or unmanaged file types. This example video contains Remko’s macro in combination with this setting, you can see that the authorized process (excel.exe in the video example) isn’t started by RES Workspace Manager itself and thereby blocked from launching after this setting is active.
security
Back to the Office KAT sheet which was used in the security scan, I tested all of this security settings in combination with Office KAT and it happens to be that I could still run the CMD and Regedit instance, I think this is because the macro’s in Office KAT starts a different embedded CMD instance in memory (ReactOS) without reading\executing anything from disk. I think this is why application guard cannot detect it, and this would probably the moment where the virusscanner should kick in.

Does it mean that malicious macro’s like Office KAT can put your environment in direct danger? No not really because we still have only user rights and any processes launched from the command prompt will be blocked by appguard. But what might be a risk is that the content of the local drives and the registry is exposed which may contain sensitive information about your infrastructure. Besides that there is another risk in the way how the default file system in Windows is designed, Tip 3 will go further on this subject but first : how can we prevent this kind of Macro’s from running?

Workaround :

– You can define trusted locations (Office 2010 and above) and run unsigned macro’s from there, when using trusted locations the Trust Center security feature is bypassed, but please note that Office KAT isn’t noticed by this feature so I wouldn’t rely on this feature only
– You can disable all macro’s through a policy or only allow signed macro’s
– Some virus scanners (also windows defender in Windows 8) detects Office KAT as a thread and places the Excel sheet in quarantine, but there are more variants of this macro’s and not all virus scanners detects them, if you want to rely on the virus scanner pick one that’s designed to detect this kind of malicious macro’s. Also be careful with stripping your virusscanner to optimize performance, it maybe you win on performance but on the other hand you might lose on security.  You can download Office KAT at the bottom of this post to check if your virusscanner detects it.

RES Software statement :

This kind of macro’s, which runs malicious code totally in memory (ReactOS in this case), is out of the scope of RES appguard, this type of macro’s should be detected by the virusscanner. (They added to this that there will be an even more tighter security mechanism in the current under development .net version of RES Workspace Manager).

Tip 3: File system security

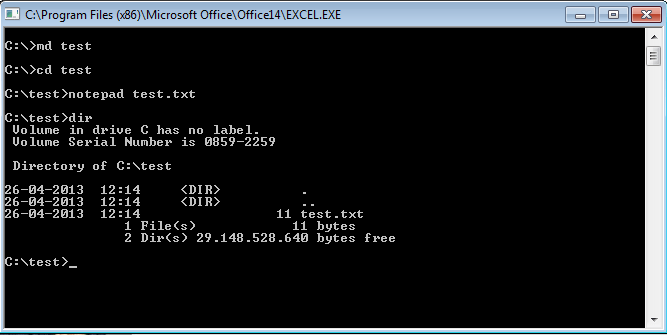
So in Tip 1 and 2 we found possible ways to get access to the local drives of the XenApp server even when access to them is strictly prohibited through policies. Besides exposing sensitive information, there is another culprit when users have access to local drives : The default ACL’s in Windows allows users to create folders on the local drives and store data in it. See below an example of CMD running under the Excel process, creating a folder and store data in it :

cmd_edit_content

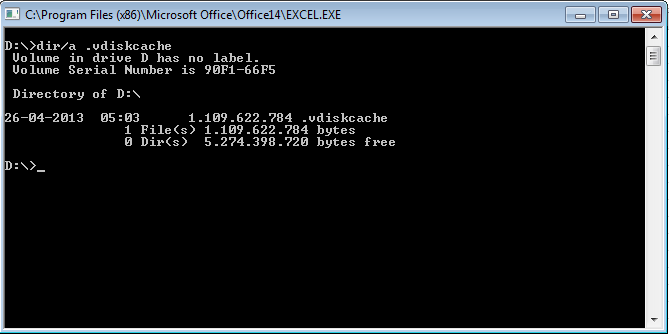
You can imagine that users (or hackers with user rights) with bad intentions can make a mess of your XenApp server and even worse they can fill up the disk with data till the disk reaches full capacity which can result in a denial of service. The benefit of using provisioned XenApp servers is that they revert to a clean state after each reboot, but the risk stays the same and may be even worse because the write-cache will grow and you can end up with failing XenApp servers because the write-cache location isn’t sized for that. Also when using provsioning in combination with a local disk for the write-cache, the same default file system security applies to this disk. We can for example browse to the D drive and see the cache file :

cmd_vdisk_cache

By default users can create folders on this disk which will persist after a reboot, when this disk is filled with data the cache file cannot grow any further. This can affect the XenApp server during run time but also after a reboot!

Workaround :

I think the most recommended way to address this risk is to accept that users in some way can access the local drives of the XenApp server, you can hide them and narrow the risk that they can be accessed through Tip 1 and 2 for example, but it’s hard to totally prevent it. Some applications for instance doesn’t respect the drive restriction policies and can expose access to the local drives. To prevent write access to the local drives you can use the RES Workspace Manager security feature called Read-only blanketing (RoB), this feature transforms the local drives to read-only drives without messing around with the default ACL’s, it’s there in Silver (security) and Gold edition, so if you are not using this feature yet you might consider it! 

Conclusion :

In this blog post I showed you some simple tips to further enhance the security of your XenApp environment in combination with RES Workspace Manager. Hopefully this information was helpful for you when security is an important consideration in your environment or design. How tight you need to secure your XenApp environment depends on the kind of company and type of data you are securing. Most of the time the more secure you make it, the more complex it will become. It’s all about eliminating risks, but I think even more important : accepting risks.

With RES Workspace Manager it becomes a lot easier to harden your environment from a user perspective, use the security features and maybe more important audit this features on ongoing basis.

You can download Office KAT here, it’s part of the Interactive Kiosk Attack Tools (iKAT) which contains more useful tools to test the security of your environment. Please be careful browsing this pages because it can contains content and material not suitable for work.

Please note that the information in this blog is provided as is without warranty of any kind.

A Deeper look into Workspace Control and its challenges

Table of contents :

1: Introduction
2: The Workspace Control process in UML
3: Workspace Control and Auto launch usability
4: Special note : Using Workspace Control with Receiver for Web
5: Special note : Using Workspace Control with Linux Receiver
6: Special note : Using Workspace Control with Native Receiver and Mobile Receivers
7: Conclusion

1: Introduction :

In this blog post I will dive a little deeper into the Citrix Workspace Control functionality, I will show you how the Workspace Control process works and what kind of challenges it can bring to the table. For those not familiar with Workspace Control, it’s the mechanism in Webinterface and Storefront that lets users (automatically) reconnect to existing sessions when they are roaming. To start with some basics : Workspace Control can reconnect two types of sessions, Active sessions and Disconnected sessions.

The Workspace Control process is triggered in the following 2 scenarios :

– The Automatic reconnect process when a user logs on to Webinterface or Storefront
– The Manual reconnect process when a user clicks on the reconnect button in Webinterface or Storefront

Workspace Control isn’t triggered in the following scenarios :

– When a user clicks on an application or desktop manually
– When Auto launch is enabled
– When you connect straight to a XenApp server, without using Webinterface or Storefront
– When Workspace Control is disabled, either by admin or user
– When points apply that you will find in the following UML flow diagram in the following chapter

2: The Workspace Control process in UML

Below you will find an UML diagram that will show you the Workspace Control process based on the Automatic and Manual reconnect process. (click to en large)

3: Workspace Control and Auto launch usability

Auto launch is a feature you can configure in Webinterface or Receiver for Web to launch a specific Application or Desktop after a user logs on, this functionality is especially useful when you have only one published desktop.  In this way the user doesn’t have to click the desktop icon, but instead it launches directly after the user authenticates. The downside of auto launch however is that it disables the Workspace Control functionality at logon. This isn’t necessarily a problem when using XenDesktop, but for XenApp this can result in multiple sessions being launched by the user and this is something you often want to prevent, it’s getting more worse when you have session limits in place because this can even prevent the user to login when there is already an active session. To overcome this I often use one of the below two methods, please leave a comment when you use other methods to solve this challenge for XenApp.

1: Restrict users to a single session, Enable Workspace Control and Disable Auto launch
In this scenario the user logs on to Webinterface or Storefront, when there is no active\disconnected session the user clicks on the Desktop or Application and launches his session. When the user logs on from another device, Workspace Control kicks in and reconnects the session immediately after the user authenticates. The user can also choose to manually disconnect and reconnect the session through Workspace Control. In this scenario Workspace Control in combination with Session limits is used to control the number of sessions on the XenApp farm.

2: Allow multiple sessions, Enable Auto launch and use RES session guard
If you have RES Workspace Manager in place, you can leverage the RES session guard feature to notify users of already active sessions and let them disconnect them on the fly. If you educate the user how to use this, session guard can be a real handy feature to simulate a Workspace Control alike functionality. Plus you can also define a group of users (through a dummy  administrative role) that can login multiple times. This is especially handy when you have shared accounts or a couple of users that needs to logon multiple times concurrently. The only down side of this method is that the user needs to login twice when an active session is detected, one time to disconnect the session and one time to reconnect to the disconnected session. The plus side is that you can enable Auto launch to immediately launch the Desktop after the user authenticates, because RES session guard will control the amount of sessions and you don’t have to use Workspace Control in combination with Session limits anymore.

Below is a printscreen of the RES Session guard in action when multiple sessions are detected :

Session Guard detects multiple sessions by creating a lock file (guard.lock) inside the homefolder , the above message is displayed when the file is detected, after the user logs off the lock file is removed.

4: Special note : Using Workspace Control with Receiver for Web

From Storefront version 1.2 the Auto launch feature is enabled by default in Receiver for Web when there is only one published Desktop available for the user, this also means that Workspace Control is disabled by default, but the most important thing to note is that since the separation of Apps and Desktops in Receiver for Web, the Workspace Control functionality is completely disabled in the Desktops section (see below screenshot for clarification). This makes sense when using XenDesktop, but you may still want to use Workspace control for your published XenApp desktops. To enable Workspace Control for published XenApp desktops, you can put a keyword in the published XenApp desktop description field (KEYWORDS:TreatAsApp) so Receiver for Web will treat it as Application instead of Desktop, thus enabling Workspace Control again.

Workspace Control (for the Apps section) can be configured by editing the web.config file in the inetpub directory of the Storefront server, this is a little step backwards because with Webinterface you could do this through the GUI.

5: Special note : Using Workspace Control with Linux Receiver

Linux Receivers found in linux based Thinclients often use the PNAgent site to request and launch published applications and desktops, the key component used here is the PNABrowse utility. PNABrowse is often scripted by the Thinclient manufacturer and embedded in the customized Thinclient OS, like the HP ThinPro and HP Smart Client series. PNABrowse uses the –WR parameter to leverage Workspace Control and connect to active and Disconnected sessions. You can control Workspace Control behavoir for this clients by editing this parameter in the following way :

-WR = Connect to Active and Disconnected sessions
-Wr = Connect to Disconnected sessions only
– Remove –WR = don’t use Workspace Control

There will be a new Linux Receiver released by the end of the year that can connect natively to Storefront without using Legacy PNAgent.

6: Special note : Using Workspace Control with Native Receiver and Mobile Receivers

For the Windows Native Receiver and Mobile Receivers connecting to Storefront, there is currently no good way to configure Workspace Control, it’s always enabled by default. Native Receivers are a good launch platform for published applications and data, but it lacks the option to fine tune them for different access scenarios like Workspace Control or Auto launch, you have to use the Receiver for Web or Webinterface if you want to control this. Also the native Receivers doesn’t make a difference between applications and desktops yet (only apps and data), so Workspace Control will be enabled for both by default which can be a problem. Hopefully Citrix will add more options to control this behavoir in future releases of Storefront.

7: Conclusion

The main goal of Workspace Control is to reconnect published applications when users are roaming, but it’s also often used in combination with session limits to control the number of user sessions and optimize the user experience. It’s clear that Citrix is moving away from Workspace Control when using published Desktops and rather use Auto launch instead, but for XenApp this can be a challenge. You can still leverage Workspace Control in newer versions of StoreFront by treating the published XenApp desktop the same as an published application. Maybe the new Flexcast Management Architecture (FMA), which is part of the upcoming Excalibur release, will change the way how we deliver and reconnect to XenApp published desktops so Workspace Control isn’t necessary anymore to control the user sessions, in the mean time you can either use Workspace Control in combination with session limits or RES session guard to optimize the user experience and control the amount of user sessions in your XenApp farm.

Please note that the information in this blog is provided as is without warranty of any kind.

How to configure WebTrace functionality in RES Workspace Manager

How to configure WebTrace functionality in RES Workspace Manager

If you have read my previous blog posts, you will notice that they are all around Citrix products. The reason for this is simple, I just have a strong passion for the Citrix product portfolio and I’m working with them for a long time now. Even in my current role as “Independent” Technical Consultant, I sometimes doubt how independent i really are, this doesn’t mean I dislike competitors, but everybody has its preferences. I share this same passion and commitment for products from RES, and especially the combination between those two.

In this first RES blog post I wanted to talk about the WebTrace functionality in RES Workspace Manager, WebTrace allows you to track down internet usage of your users, of course this must be allowed by company policies and the users should be aware that there internet behavoir is monitored.
WebTrace is one of the few components in RES Workspace Manager that doesn’t completely work out-of-the-box, when you enable it in a WIN2008R2\WIN7 environment in combination with Internet Explorer you will soon see that there is no internet traffic being logged.
This is mainly because the Web Trace Browser Helper Object (BHO) is being blocked by the Internet Protected mode which is switched on by default on the Internet security zone.

To enable the WebTrace functionality you can follow this procedure :

Step 1: Switch on WebTrace in the Workspace Manager Console

Switch on the following option under Setup -> Usage Tracking :

Step 2: Configure an Internet Explorer policy to enable the WebTrace BHO for the users

Before we do this we first have to look up the Class ID of the Web Trace BHO by opening the properties of the BHO, the BHO can be found in Internet Explorer under Manage Add-Ons :

Ok now we know the BHO Class ID we can create the Internet Explorer policy, to enable the WebTrace BHO and block the users from disabling it you can follow this steps :

– Create a new (or edit existing) policy based on inetres.admx
– Search the policy for the option “Add-on List” and open it.
– Fill in the Class ID : {65363486-5B64-4199-9087-2CB3543A3BDC} with a value of 1, see screenshot :

– Enable the option “Do not allow users to enable or disable add-ons” (to block users from disabling the BHO)
– Enable the option “Disable add-on performance notifications” (to avoid performance popups for startup times of the add-ons)

The policy now looks like this :

Step 3: Configure an Internet Explorer registry key to disable Internet Explorer protected mode

**Warning:  Before you proceed, you should be aware that disabling Internet Explorer protected mode can have security implications**

Because the WebTrace BHO doesn’t work when Protected Mode is switched on (according to RES this is because the BHO needs more access to system resources which is blocked when running in Protected Mode) we need to turn it off for the Internet Security zone (it’s already switch off for the other zones by default). This can be done through the following registry key :

“HKCU\Software\Microsoft\Windows\CurrentVersion\Internet Settings\Zones\3” “2500”=dword:00000003
To make it more visual (click to enlarge) :

If Protected Mode is switched off users will get a message when browsing over the internet stating that Protected Mode is not turned on, to disable this warning import the following registry key :

“HKCU\Software\Microsoft\Internet Explorer\Main” “NoProtectedModeBanner”=dword:00000001
And this looks like this :

That’s it, WebTrace will now start logging Internet traffic, which you can view in the Usage Tracking viewer in the RES Workspace Manager Console.

Conclusion :

In this blog post I showed you how you can enable the WebTrace functionality in a WIN2008R2\WIN7 environment when using Internet Explorer. It’s a nice feature but you should only enable it when necessary and take into consideration that Internet Explorer Protected Mode needs to be switched off for the WebTrace BHO to function, maybe RES will update the WebTrace BHO in the future so this would not be necessary anymore.

Please note that the information in this blog is provided as is without warranty of any kind.